전체 흐름
웹 화면
→ Function Name / Import Parameters / Output Table Names 입력
→ Spring Boot API 호출
→ SAP JCo로 RFC Function Module 실행
→ TABLES 파라미터 조회
→ JSON 형태로 화면 출력
1. RFC 결과용 Structure 생성
먼저 Function Module의 TABLES 파라미터에서 사용할 라인 구조를 만든다.
SE11
→ Data Type
→ ZEDU_EMP_ENROLL_S
→ Create
→ Structure
구성 필드는 다음과 같다.
Component    Type
-------------------------------
ENROLL_ID    CHAR 또는 기존 신청ID 타입
COURSE_ID    CHAR 또는 기존 과정ID 타입
EMP_ID       CHAR 또는 기존 사번 타입
EMP_NAME     CHAR 또는 기존 성명 타입
DEPT_NAME    CHAR 또는 기존 부서 타입
STATUS       CHAR1
REQ_DATE     DATS
COMP_DATE    DATS
생성 후 Activate 한다.
2. Table Type 생성
Function Module의 TABLES 탭에서 사용할 테이블 타입을 생성한다.
SE11
→ Data Type
→ ZEDU_EMP_ENROLL_TT
→ Create
→ Table Type
설정값은 다음과 같다.
Line Type   : ZEDU_EMP_ENROLL_S
Access Mode : Standard Table
Key         : Standard Key 또는 Default Key
생성 후 Activate 한다.
3. RFC Function Module 생성
Function Module은 SE37에서 생성한다.
Function Module : ZRFC_GET_EMP_ENROLLMENTS
Processing Type : Remote-Enabled Module
Import 탭
Parameter Name : IV_EMP_ID
Typing         : TYPE
Associated Type: 사번 타입 또는 CHAR
Tables 탭
Parameter Name : ET_RESULT
Typing         : TYPE
Associated Type: ZEDU_EMP_ENROLL_TT
Source Code
FUNCTION zrfc_get_emp_enrollments.
*"----------------------------------------------------------------------
*"*"Local Interface:
*"  IMPORTING
*"     VALUE(IV_EMP_ID) TYPE ZEDU_ENROLL-EMP_ID
*"  TABLES
*"      ET_RESULT TYPE ZEDU_EMP_ENROLL_TT
*"----------------------------------------------------------------------

  CLEAR et_result[].

  SELECT enroll_id,
         course_id,
         emp_id,
         emp_name,
         dept_name,
         status,
         req_date,
         comp_date
    FROM zedu_enroll
    WHERE emp_id = @iv_emp_id
    INTO CORRESPONDING FIELDS OF TABLE @et_result.

ENDFUNCTION.
Function Module을 Activate 한 뒤 SE37에서 IV_EMP_ID 값을 넣고 테스트한다.
4. Spring Boot RFC 설정
application.yml에 SAP RFC 접속 정보를 설정한다.
sap:
  rfc:
    destination-name: "A4H_LOCAL"
    ashost: "vhcala4hci"
    sysnr: "00"
    client: "001"
    user: "DEVELOPER"
    passwd: "ABAPtr2023#00"
    lang: "EN"
    pool-capacity: "3"
    peak-limit: "10"
passwd 값에 # 문자가 포함되어 있으므로 반드시 따옴표로 감싼다.
5. RFC 요청 DTO 구성
웹 화면에서 Function Module명, Import 파라미터, Output Table명을 입력받기 위해 요청 DTO를 구성한다.
package com.sapconsole.app.dto;

import java.util.List;
import java.util.Map;

public record RfcCallRequest(
        String functionName,
        Map<String, Object> importParams,
        List<String> outputTableNames
) {
}
6. SAP JCo RFC 호출 구현
RFC 호출 시 Import 파라미터를 세팅하고, 실행 후 TABLES 파라미터를 읽어 JSON으로 내려줄 수 있는 Map 구조로 변환한다.
public Map<String, Object> callFunction(
        String functionName,
        Map<String, Object> importParams,
        List<String> outputTableNames
) {
    try {
        JCoDestination destination = JCoDestinationManager.getDestination(
                rfcProperties.destinationName()
        );

        JCoFunction function = destination
                .getRepository()
                .getFunction(functionName);

        if (function == null) {
            throw new RuntimeException("RFC Function not found: " + functionName);
        }

        setImportParameters(function, importParams);

        function.execute(destination);

        Map<String, Object> result = new LinkedHashMap<>();

        result.put("functionName", functionName);
        result.put("destinationName", rfcProperties.destinationName());
        result.put("tables", readTableParameters(function, outputTableNames));

        return result;

    } catch (Exception e) {
        throw new RuntimeException("SAP RFC call failed: " + e.getMessage(), e);
    }
}
Import 파라미터 세팅은 다음과 같이 처리한다.
private void setImportParameters(JCoFunction function, Map<String, Object> importParams) {
    if (importParams == null || importParams.isEmpty()) {
        return;
    }

    JCoParameterList imports = function.getImportParameterList();

    if (imports == null) {
        return;
    }

    importParams.forEach((name, value) -> {
        if (name == null || name.isBlank()) {
            return;
        }

        imports.setValue(name.trim().toUpperCase(), value);
    });
}
TABLES 파라미터는 화면에서 입력한 Output Table Names 기준으로 읽는다.
private Map<String, Object> readTableParameters(
        JCoFunction function,
        List<String> outputTableNames
) {
    Map<String, Object> tables = new LinkedHashMap<>();

    JCoParameterList tableParameterList = function.getTableParameterList();

    if (tableParameterList == null) {
        return tables;
    }

    boolean readAllTables = outputTableNames == null || outputTableNames.isEmpty();

    if (readAllTables) {
        for (JCoField tableField : tableParameterList) {
            String tableName = tableField.getName();
            JCoTable table = tableParameterList.getTable(tableName);
            tables.put(tableName, convertTableToList(table));
        }

        return tables;
    }

    for (String tableName : outputTableNames) {
        if (tableName == null || tableName.isBlank()) {
            continue;
        }

        String normalizedTableName = tableName.trim().toUpperCase();
        JCoTable table = tableParameterList.getTable(normalizedTableName);
        tables.put(normalizedTableName, convertTableToList(table));
    }

    return tables;
}
JCoTable은 List 형태로 변환한다.
private List<Map<String, Object>> convertTableToList(JCoTable table) {
    List<Map<String, Object>> rows = new ArrayList<>();

    if (table == null) {
        return rows;
    }

    for (int i = 0; i < table.getNumRows(); i++) {
        table.setRow(i);

        Map<String, Object> row = new LinkedHashMap<>();

        for (JCoField field : table) {
            row.put(field.getName(), field.getString());
        }

        rows.add(row);
    }

    return rows;
}
7. RFC 호출 API 구성
Controller에서는 웹 화면에서 받은 요청을 그대로 Service로 전달한다.
@PostMapping("/call")
public ApiResponse<Map<String, Object>> call(@RequestBody RfcCallRequest request) {
    return ApiResponse.ok(rfcTestService.call(request));
}
Service에서는 JCo Client를 호출한다.
public Map<String, Object> call(RfcCallRequest request) {
    return sapRfcClient.callFunction(
            request.functionName(),
            request.importParams(),
            request.outputTableNames()
    );
}
8. 화면 입력 영역 구성
HTML 화면에서는 Function Module명, Import Parameters JSON, Output Table Names를 입력받는다.
<div class="card">
    <h2>RFC Test</h2>

    <div class="form-row">
        <label for="functionName">Function Name</label>
        <input type="text" id="functionName" value="ZRFC_GET_EMP_ENROLLMENTS">
    </div>

    <div class="form-row">
        <label for="importParams">Import Parameters JSON</label>
        <textarea id="importParams">{
  "IV_EMP_ID": "E00001"
}</textarea>
    </div>

    <div class="form-row">
        <label for="outputTableNames">Output Table Names</label>
        <input type="text" id="outputTableNames" value="ET_RESULT" placeholder="예: ET_RESULT, ET_LOG">
    </div>

    <button id="btnRfcCall">RFC CALL</button>
</div>
9. 화면에서 RFC 호출
app.js에서는 Output Table Names 입력값을 콤마 기준으로 분리해서 서버로 전달한다.
$('#btnRfcCall').on('click', function () {
    let importParams = {};

    try {
        importParams = JSON.parse($('#importParams').val() || '{}');
    } catch (e) {
        showResult({
            success: false,
            message: 'Import Parameters JSON 형식이 올바르지 않습니다.',
            error: e.message
        }, true);
        return;
    }

    const outputTableText = $('#outputTableNames').val() || '';

    const outputTableNames = outputTableText
        .split(',')
        .map(function (name) {
            return name.trim();
        })
        .filter(function (name) {
            return name.length > 0;
        });

    const body = {
        functionName: $('#functionName').val(),
        importParams: importParams,
        outputTableNames: outputTableNames
    };

    apiPost('/api/rfc/call', body, 'RFC CALL');
});
10. 테스트 입력값
화면에는 다음과 같이 입력한다.
Function Name
ZRFC_GET_EMP_ENROLLMENTSImport Parameters JSON
{
  "IV_EMP_ID": "E00001"
}
Output Table Names
ET_RESULT11. 결과 예시
RFC 호출 결과는 화면에서 JSON 형태로 확인할 수 있다.
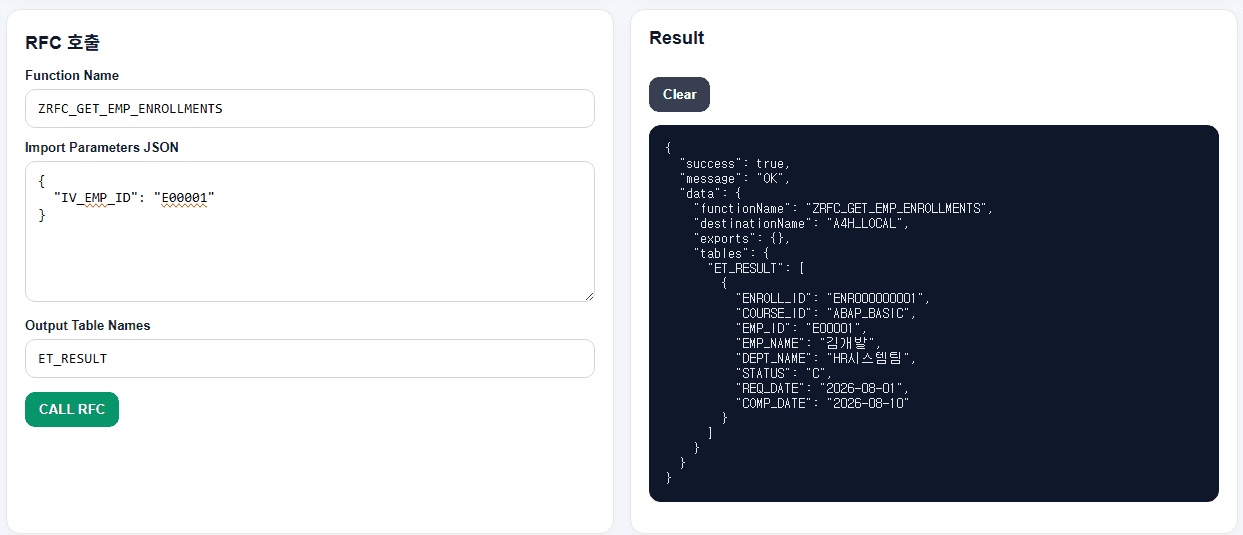
{
  "success": true,
  "message": "OK",
  "data": {
    "functionName": "ZRFC_GET_EMP_ENROLLMENTS",
    "destinationName": "A4H_LOCAL",
    "tables": {
      "ET_RESULT": [
        {
          "ENROLL_ID": "ENR000000001",
          "COURSE_ID": "ABAP_BASIC",
          "EMP_ID": "E00001",
          "EMP_NAME": "홍길동",
          "DEPT_NAME": "IT팀",
          "STATUS": "A",
          "REQ_DATE": "20260810",
          "COMP_DATE": "00000000"
        }
      ]
    }
  }
}
COMMENTS
댓글
GitHub 계정으로 로그인하면 댓글을 남길 수 있습니다.
댓글을 불러오는 중입니다.